Table of Contents
Mastering Fishing Photography: Essential Tips for Capturing Your Catch Perfectly
Understanding Lighting for Stunning Fishing Photographs
Lighting plays a vital role in fishing photography, whether you’re capturing a trophy fish or the stunning landscape surrounding your fishing spot. Early mornings and late afternoons offer the best natural light, renowned as the “golden hours,” when the sunlight is soft, warm, and diffused. Shooting during these times can help you avoid harsh shadows and glaring reflections on the water.
When photographing your catch, position yourself so the light illuminates the fish evenly. Avoid direct overhead sunlight, which can cause unwanted glare or wash out colors. If shooting on a boat or by the water, consider how reflections influence your shot; sometimes a polarized lens can reduce glare and make the water look more transparent, adding depth to your photo.
Capturing the Action: Tips for Dynamic Boat and Fishing Scenes
Fishing photography isn’t only about static shots of your catch. The excitement of the action on the boat, the cast, the struggle with a strong fish, and the expressions on your face and your companions create compelling images rich in storytelling.
- Use a Fast Shutter Speed: To freeze motion like casting the line or reeling in a fish, set your camera to a fast shutter speed. This prevents blur and captures sharp moments.
- Focus on Faces and Emotions: Pictures of joy, concentration, or surprise connect with viewers more deeply than shots showing only fish.
- Use Continuous Shooting Mode: This feature lets you take bursts of photos during fast action, increasing your chances of getting the perfect frame.
Engage actively with the fishing experience to anticipate peak moments—for example, when a fish strikes or a reel spins wildly—to capture those magical instances.
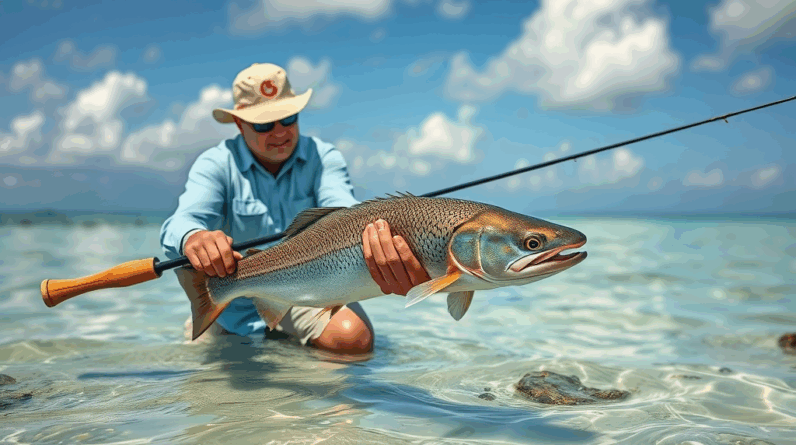
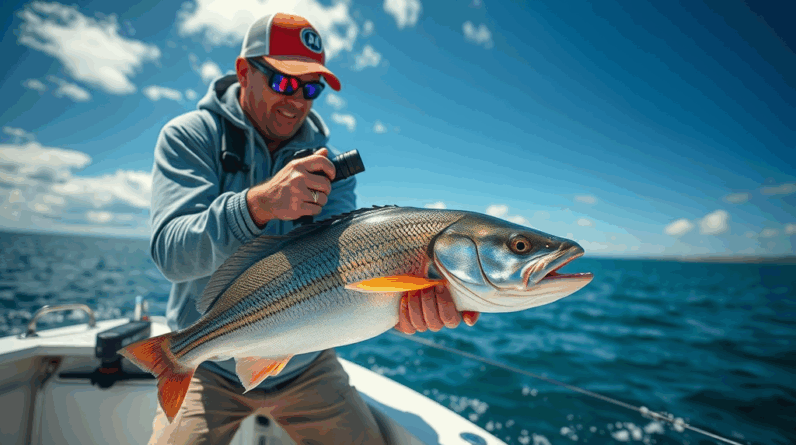
Showcasing Your Catch with Vibrancy and Detail
Once you have your fish in hand, follow some key pointers to highlight its size, color, and texture beautifully:
- Get Close and Fill the Frame: Approach your subject carefully to avoid scaring the fish away or dropping it. Fill the frame with your catch to emphasize its features.
- Use Natural Elements for Scale: Include your hand or fishing gear in the frame. This helps viewers grasp the size of the fish instantly.
- Mind the Background: A clean, uncluttered background ensures the fish stands out. Alternatively, the natural setting—like a clear stream or lush greenery—can enhance your photo’s appeal without distraction.
Pay attention to how the fish’s scales shine in the light. Adjusting the angle slightly or using a reflector can enhance this sparkling effect.
Choosing the Right Equipment for Fishing Photography
While smartphones can capture decent fishing photos, investing in certain camera gear can elevate your work significantly:
- Camera: A DSLR or mirrorless camera with good autofocus capabilities works well, especially for action shots.
- Lenses: A versatile zoom lens (e.g., 24-70mm) allows you to switch between wide scenic views and close-ups of the catch. A macro lens is perfect for detailed shots of scales and lures.
- Polarizing Filter: This reduces water reflections and enhances colors, especially useful around lakes or rivers.
- Waterproof Gear: Whether it’s a waterproof camera case or a protective sleeve, keeping your equipment dry in fishing environments is critical.
Additionally, carrying a small tripod or a monopod can aid in stabilizing your shots, particularly in lower light or when capturing the serene surroundings.
Composing Your Fishing Shots with Creativity
Creative composition breathes life into fishing photography, making each image stand out. Here are some composition strategies tailored to fishing scenes:
- Rule of Thirds: Place key elements like your catch or the horizon along the thirds of your frame. This creates balance and visual interest.
- Use Leading Lines: Boat edges, fishing rods, or ripples on the water can guide viewers’ eyes toward the focal point.
- Incorporate Foreground and Background: Combining the riverbank, reflections, and distant hills adds depth and context to your photo.
- Experiment with Angles: Shooting from a low angle can emphasize the size of your catch, while overhead shots can capture the full scene on your boat.
Maintaining Your Subject’s Safety for Ethical Fishing Photography
Respect for wildlife must be a priority when photographing your catch. Handle fish gently, keep them wet, and minimize the time out of the water to ensure their health if you plan to release them. This ethical approach also cultivates natural fish behavior, allowing you to capture more authentic shots.
Using gloves or wet hands protects the fish’s delicate skin and scales. Plan your shots in advance to avoid rushing, which reduces stress on the animal. This patience not only helps ensure the fish’s safety but results in more relaxed, natural images.
By blending technical knowledge, creative vision, and genuine fishing enthusiasm, your photographs will vividly showcase the thrill of fishing. Whether you want to highlight the gleaming scales of your catch, the serene waterscape, or the excitement on your boat, mastering these tips will help you capture moments that resonate and inspire fellow fishing enthusiasts.
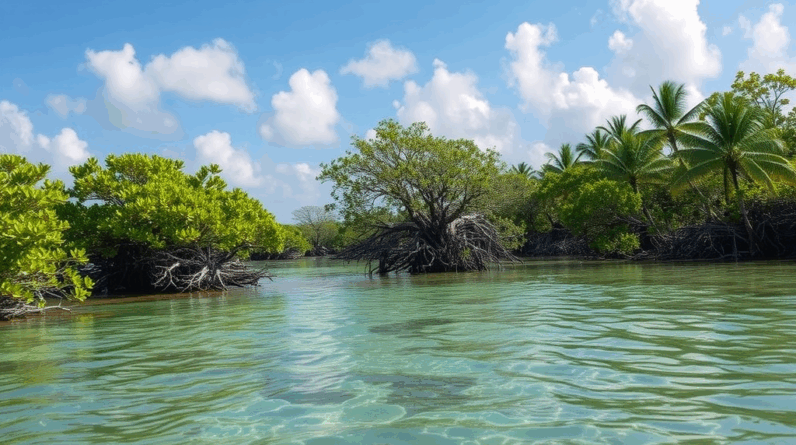
Showcasing Scenic Beauty: How to Frame Nature in Your Fishing Photos
Capturing the Essence of Your Fishing Spot
When you’re out fishing, the atmosphere around you is just as important as the catch itself. To truly showcase the scenic beauty in your fishing photos, focus on incorporating the natural environment alongside your subject. Instead of isolating the fish or the fisherman against a plain background, try to let the surroundings tell the story. Think about the sparkling water, the lush greenery, the sky’s colors, or even the rugged rocks or shoreline contours. These elements create context and add depth to your photographs.
Choosing the Right Time and Light
Lighting plays a massive role in highlighting nature’s beauty. Early mornings and late afternoons provide the best natural light, often called the “golden hour,” which casts warm, soft tones and enhances textures without harsh shadows. Shooting during these times makes your photos feel warm and inviting. Overcast days can also be beneficial by offering diffuse lighting that reduces glare on the water and softens reflections.
Techniques to Frame Your Shots Effectively
A carefully composed frame can transform an ordinary picture into a stunning image. Here are some techniques to help you frame your shots:
- Rule of Thirds: Imagine dividing your frame into a 3×3 grid and place key elements, like your fishing rod or a tree, along these lines or at their intersections to create balance.
- Foreground Interest: Include objects in the foreground, such as rocks, plants, or ripples, to add layers and lead the viewer’s eye into the scene.
- Natural Frames: Use branches, reeds, or the boat’s edge to frame your subject. This technique draws attention directly to the catch or action while showcasing the environment.
- Leading Lines: Capture paths, shorelines, or refill trails in the water that guide the viewer’s gaze through your image, creating a sense of depth and movement.
Balancing the Subject with Scenic Landscape
While the fish or angler is often the star of your photos, including more of the background emphasizes your location’s uniqueness. Position your subject so that the landscape, water reflections, and sky work together harmoniously. For example, a wide-angle shot that captures the fisherman holding a catch near a mirror-flat lake with mountains in the distance creates a powerful connection between action and nature.
Don’t be afraid to experiment with perspectives. Shoot from low angles near the water’s surface to amplify reflections and water textures, or climb higher up to reveal vast panoramic views. Both approaches help present the scenic beauty more dramatically.
Using Color and Contrast to Enhance Natural Elements
Nature provides a rich palette of colors to incorporate into your fishing photos. Pay close attention to vibrant greens from trees and bushes, the blues and silvers of the water, or the warm hues during sunrise or sunset. These colors can form a stunning backdrop for your catch and create eye-catching contrasts.
Adjust your camera’s settings or post-processing to boost saturation moderately without making the image look unnatural. Increasing contrast slightly can also enhance details in textures like bark, rocks, or water ripples, making the scenery feel more immersive.
Equipment Choices for Scenic Fishing Photography
Investing in the right gear helps you make the most of the picturesque surroundings:
- Lenses: A wide-angle lens (10-24mm) is excellent for capturing vast landscapes and big sky views. A mid-range zoom lens (24-70mm) works well for including the subject with some background. For detailed close-ups of fish or water textures, a macro lens or a telephoto lens (70-200mm) is great.
- Tripod: Using a tripod stabilizes your camera for sharper images, especially in lower light conditions during sunrise or sunset.
- Polarizing Filter: This reduces glare and reflections from the water, bringing out natural colors and underwater details.
Action and Movement
Capturing motion, like the splash when a fish is caught or the gentle sway of reeds, adds energy and life to your scenic fishing shots. Use faster shutter speeds to freeze action crystal-clear, or slower speeds to create beautiful motion blur that conveys a serene, flowing environment.
Tips for Post-Processing to Bring Out Scenic Beauty
Editing your photos with an eye for nature’s beauty can dramatically improve results. Focus on:
- Enhancing colors without overdoing saturation.
- Increasing sharpness and clarity where needed while keeping a natural look.
- Adjusting white balance to reflect the mood—warmer tones for dawn or dusk, cooler for cloudy days.
- Cropping to improve composition and remove distracting elements.
Remember, the goal is to preserve the authentic feeling of your fishing experience and the beautiful environment around you.
Patience and Observation: Your Greatest Tools
Being patient and observant allows you to notice small details and the perfect moments worth capturing. Watch how light changes on the water or how wildlife interacts with the surroundings. These subtle cues help you create photos that not only show your catch but also celebrate the scenic harmony of fishing in nature.
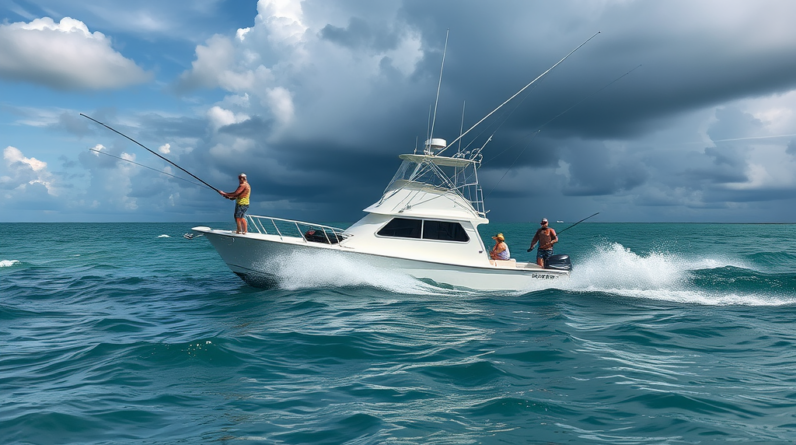
Action Shots on the Boat: Techniques for Capturing Dynamic Fishing Moments
Capturing the thrill of fishing on a boat demands more than just pointing a camera at the action. To freeze those adrenaline-pumping moments—the tug on the line, the splash of a catch, or the intense focus on an angler’s face—you need a blend of preparation, technique, and the right gear. Fishing photography that centers on dynamic, action-packed scenes brings stories to life, revealing the excitement and challenges encountered on the water.
Understanding the Lighting on the Water
Lighting plays a crucial role in any form of photography, and when you’re on a boat, it becomes even more important. Light reflects off the water’s surface, causing glare and harsh highlights that can wash out your photos. Early morning or late afternoon—the golden hours—offer soft, warm light, ideal for capturing movement without harsh shadows. Avoid shooting when the sun is high and overhead, as this can create unwanted contrast and make it difficult to capture fast-moving subjects clearly.
Consider positioning yourself so the sun is slightly behind or beside your subject to highlight details and maintain balanced exposure. Using a polarizing filter on your camera lens helps to reduce glare from the water, enhancing color saturation and sharpness in your images. It’s a small investment that dramatically improves photo quality in bright environments.
Camera Settings for Crisp Action Shots
When photographing fast motion, like a fish jumping or a fisherman reeling in a catch, camera settings need to prioritize speed and clarity. To freeze action effectively, use a fast shutter speed—typically 1/1000th of a second or faster. This ensures the movement is sharp without blur. Increasing your camera’s ISO allows for these faster shutter speeds, especially in lower light conditions, though be mindful of introducing noise that could lower image quality.
Continuous autofocus (AF-C or AI-Servo mode) is essential. This setting keeps the moving subject in sharp focus as the scene changes, making it ideal for dynamic action on a boat. Additionally, switch to burst mode (continuous shooting) to capture several frames quickly. This technique increases your chances of getting the perfect shot during split-second fishing moments worth remembering.
Composition Tips to Highlight the Energy
Effective composition can transform a good action photo into a captivating one. Use the rule of thirds to place your subject off-center, creating a sense of movement and space. Capture the anticipation in the angler’s expression, the tension in the fishing rod, or the splash where the fish breaks the water’s surface.
Incorporate the surroundings to add context and drama. Showing the boat deck, the water, or nearby wildlife can enrich the story behind the shot. Always be mindful of the background; a cluttered or distracting backdrop can take attention away from the main subject.
Stabilizing Your Shots on an Unsteady Platform
Boats are naturally unstable environments, prone to rocking and sudden jerks. To counteract this and keep your shots sharp, use image stabilization if your camera or lens supports it. A faster shutter speed also helps neutralize the motion blur caused by boat movement.
For handheld shooting, adopt a wide stance and keep your elbows close to your body to gain stability. If possible, anchor yourself by sitting or leaning against solid boat structures. Some anglers use small tripods or monopods designed for boat use, which provide additional steadiness while allowing quick movement to follow the action.
Anticipating the Moment to Capture Peak Action
Great fishing photography depends heavily on timing. Anticipating the precise moment when the fish strikes the bait or the angler reacts can help you capture those peak, energetic instances. Watch the behavior closely, learning the rhythm of fishing action to predict when something exciting will happen.
Communicating with your fishing partners can be valuable. Letting you know when a fish is on the line or when the boat is moving fast enhances your ability to prepare and adjust settings quickly. Being ready to shoot before the event happens means you won’t miss the decisive moment.
Choosing the Right Equipment for Action on a Boat
A fast lens with a wide aperture (f/2.8 or wider) is perfect for isolating the subject from the background and performing well in varying light. Zoom lenses with a focal range from 24-70mm or 70-200mm offer flexibility to capture both close-up action and wider scenes from a safe distance.
Waterproof or weather-sealed cameras and lenses provide extra durability in the damp, splash-prone boat environment. Protecting your gear with waterproof cases or rain covers ensures it stays functional throughout your fishing adventure.
Post-Processing to Enhance Action and Detail
Editing your photos afterward can improve clarity, contrast, and color vibrancy, making the dynamic elements of the image pop. Use software tools to crop tightly on key moments, sharpen details, and adjust shadows and highlights for a balanced look. Avoid over-editing; maintaining natural tones preserves the authenticity of the fishing experience.
By combining mindful preparation, technical knowledge, and a keen eye for action, you can master the art of capturing fishing moments on a boat that thrill and inspire. The excitement of the catch, the challenge on the angler’s face, and the vivid beauty of the aquatic environment come alive in your photos—turning fleeting moments into timeless memories.
Choosing the Right Equipment and Settings for Fishing Photography
Essential Gear for Capturing Stunning Fishing Moments
Choosing the right gear plays a crucial role in fishing photography, whether you’re aiming to document your impressive catch, capture the serene beauty of the water, or showcase the action-packed environment on the boat. Start with a camera that offers flexibility and good performance in different lighting conditions. Many anglers prefer mirrorless or DSLR cameras for their superior image quality and fast autofocus, which is essential to freeze moments like a fish striking or a splash from a reel.
However, you don’t have to have the most expensive camera to capture great images. Modern smartphones with high-quality cameras have advanced to the point where they can take clear and vivid shots if used well. Consider investing in a waterproof case or housing for your phone or camera to protect your equipment from water splashes or accidental drops, especially if you’re working near or on the water.
Lens Choices to Suit Various Fishing Photography Styles
The lens you choose can dramatically influence the type of fishing photos you capture. Here’s a quick guide:
- Wide-Angle Lens (10-24mm): Ideal for scenic shots that include the vastness of lakes, rivers, and the landscape. It’s perfect for showing the environment around your fishing spot, including sunrise over the water or dramatic cloud formations.
- Standard Zoom Lens (24-70mm): Offers versatility for mid-range shots. This lens works well when you want to balance between capturing some of the surroundings along with your catch or the action on the boat.
- Telephoto Lens (70-200mm): Great for close-up shots from a distance. This is useful when photographing fish in the water, capturing the moment of the catch without disturbing the scene, or shooting candid action shots of your fishing companions.
If budget or weight is a concern, consider a zoom lens with a broad focal length range, like 18-200mm, which can cover most scenarios without switching lenses frequently.
Optimal Camera Settings for Vibrant, Crisp Images
Getting your camera settings right can make the difference between a blurry, dull photo and a sharp, life-like image. Here are important settings to consider when photographing fishing scenes:
Shutter Speed
Fishing photography often involves movement, from splashing water to fish thrashing on the line. Use a fast shutter speed (1/500 seconds or faster) to freeze these moments sharply. For calmer shots, like serene water scenes, slower shutter speeds around 1/60 seconds can create a smooth, relaxing effect, but be sure to use a tripod to avoid camera shake.
Aperture
Select a wider aperture (small f-number like f/2.8 to f/5.6) to blur the background and bring your catch into sharp focus. This technique helps emphasize your subject and eliminate distractions. If you want more of the scene in focus, for example capturing the boat and the water, choose a smaller aperture (larger f-number like f/11 to f/16).
ISO Sensitivity
Keep ISO as low as possible (100–400) to minimize grainy noise in your images. Fishing often happens outdoors where light can be ample, so there’s usually no need to bump ISO high. However, in early morning or evening light, you might have to increase it slightly, balancing it with faster shutter speeds.
Use of Filters and Accessories
Polarizing filters are essential for fishing photography. They reduce glare from the water surface and enhance the colors of the water and sky, allowing you to capture the true beauty beneath the light reflections. A UV filter also helps protect your lens from scratches and splashes.
Having a sturdy tripod or a flexible gorillapod can stabilize your shots, especially when using longer exposures or telephoto lenses. Don’t forget extra batteries and memory cards to keep shooting without interruptions during a day on the water.
Tips for Better Composition and Lighting
Always aim to shoot with the sun behind you to illuminate your subject and avoid harsh shadows. The golden hours—early morning and late afternoon—provide soft, warm light that makes your images stand out. Keep an eye on the background and try to position yourself so that it complements your subject rather than competes with it.
Use the rule of thirds to place your subject off-center for a more dynamic image. Capture both horizontal and vertical shots to have diverse options and perspectives. Including elements like fishing gear, lines, or the boat’s features can add storytelling depth to your photos.
By carefully selecting your equipment and adjusting your camera settings to match the conditions, you can transform simple fishing outings into opportunities for beautiful, memorable photography that highlights every aspect—from the catch to the captivating scenery and high-energy action on the boat.
Editing and Enhancing Fishing Photos to Highlight True Colors and Details
Bringing Your Fishing Photos to Life Through Skillful Editing
Capturing a breathtaking fishing photo is only the first step; the true magic often happens during the editing phase. You want your images to showcase the vibrant colors of your catch, the serene beauty of the water, and the dynamic moments unfolding on your boat. Editing and enhancing fishing photos helps emphasize these elements, making each shot more vivid and compelling without losing its natural feel.
Getting Started: Selecting the Right Photo
Before diving into any edits, start by carefully selecting the best photos from your fishing trip. Look for images where the subject—the fish, scenery, or action—is sharp and well-composed. Avoid blurry or poorly lit shots, as no amount of editing can fully recover them. Picking a clear, well-exposed base photo will make your editing tasks more efficient and the final result much more impressive.
Essential Editing Tools and Software
You don’t need to be a professional for effective photo editing. Various user-friendly applications can enhance your fishing photos quickly and effectively. Popular tools include:
- Adobe Lightroom: Offers excellent color correction, exposure adjustments, and sharpening tools.
- Snapseed: A free mobile app that’s incredibly powerful for on-the-go editing.
- Photoshop Elements: Simplified version of Photoshop, perfect for beginners looking to enhance details.
With any of these tools, focus on fine-tuning contrast, brightness, and color saturation to make the photo pop.
Enhancing Colors While Keeping Natural Tones
When adjusting colors, it’s crucial to highlight the natural beauty of your fishing environment and catch without making the photo look overly processed. Here are some tips to help preserve authenticity:
- Correct White Balance: Daylight conditions can shift colors. Adjust white balance to keep hues true, especially for the water and fish scales.
- Boost Saturation Selectively: Increase saturation gently to emphasize the fish’s colors or the sunset glow but avoid overdoing it to keep the image realistic.
- Use Vibrance Adjustments: Vibrance boosts less saturated colors more than those already saturated, helping maintain a balanced overall tone.
Sharpening and Detail Enhancement for Impact
Sharpness draws the viewer’s eye to key parts of the photo, such as the fish’s eyes or sparkling water droplets. Here’s how to effectively enhance details:
- Apply Subtle Sharpening: Use sharpening tools moderately to make textures—like scales or fishing gear—stand out clearly without creating noise.
- Local Adjustments: Many editing programs allow you to sharpen specific areas, so focus on your catch or action points without affecting the entire image.
- Clarity and Structure Features: Increase mid-tone contrast to bring out textures and depth. This is great for detailed shots of the boat or fishing equipment.
Balancing Light and Shadows
Fishing photos often contain varying lighting conditions—bright sunlight, shadows cast by trees or boat canopies, and reflective water surfaces. Managing these contrasts can make or break your photo’s appeal:
- Adjust Exposure: Brighten darker areas while preserving highlights to avoid washed-out skies or overexposed water reflections.
- Use Shadows and Highlights Sliders: Recover details in underexposed shadows, like the details of a fish’s scales, and tame bright spots for a balanced feel.
- Dodge and Burn Techniques: Lighten or darken specific parts to guide the viewer’s eye, such as brightening a catch or dimming distracting backgrounds.
Creative Enhancements to Elevate Your Fishing Shots
Beyond basic edits, creative touches can infuse personality into your fishing photos:
- Crop for Focus: Tighten your composition to center your catch or action, removing unwanted distractions around the edges.
- Add Vignettes: A subtle darkening around the edges draws attention inward, perfect for emphasizing your fish or the fisherman’s expression.
- Apply Filters Sparingly: While filters can add mood, pick those that enhance without overshadowing the natural essence.
Preserving the Authenticity of Your Fishing Experience
The ultimate goal of post-processing fishing photos is enhancing the story they tell without undoing the authenticity of your adventure. Keep the edits light and natural, focusing on showcasing the true colors, fine details, and atmosphere of your day on the water. Authenticity connects with viewers and fellow anglers, making your photos more memorable and inspiring.
Exporting Your Enhanced Images
Once you’ve fine-tuned your photos, export them in the right format and resolution depending on how you want to use them:
- Online Sharing: Export JPEGs at 72 DPI for smooth website loading and social media compatibility.
- Print Quality: Use higher resolution TIFF or JPEG files (300 DPI or above) to maintain sharpness in physical prints.
- Backup Originals: Always save your original unedited files separately for future edits or reprocessing.
By following these editing strategies, you’ll turn your fishing photos into vivid, detailed keepsakes that truly celebrate your fishing success, the scenic beauty around you, and the thrill of the action. Each enhanced photo becomes a window reflecting your unforgettable experience on the water.
Conclusion
Capturing the essence of fishing through photography is an enriching way to preserve your outdoor memories and share the thrill of the catch. By mastering essential tips for photographing your catch, you ensure every fish is showcased in its best light, reflecting the pride and excitement you feel. Framing the natural surroundings with care brings the scenic beauty of your fishing spot to life, inviting viewers to experience the tranquility and wonder of nature alongside you. When it comes to dynamic moments on the boat, focusing on action shots adds energy and storytelling to your photo collection, highlighting the passion and movement that define fishing adventures.
Selecting the right camera equipment and adjusting your settings thoughtfully empower you to capture sharp, vibrant images regardless of lighting conditions or weather. This foundation makes every shot count, whether it’s a close-up of a shimmering fish or a wide-angle view of the peaceful water. editing your photos with attention to color, contrast, and detail helps bring out the true spirit of your fishing experience. Enhancements that stay natural elevate your images without losing authenticity, making every picture a vivid reminder of your time spent outdoors.
By combining these strategies, you can create compelling fishing photography that tells your unique story and inspires others to appreciate the beauty and excitement of fishing. Whether you’re behind the lens or out on the water, each shot captured is a chance to celebrate the art and adventure of this timeless activity.